How to Import and Export MBOX and EML files using Proton Mail Bridge and Mozilla Thunderbird
To create a backup of your account or migrate between Proton Mail accounts, we recommend using the Export Tool. When importing messages from your previous provider, we recommend using Easy Switch — if your provider is supported, or you have an option to connect using IMAP.
However, in cases where you are migrating from a provider that does not use IMAP, or you need to export a specific folder of messages from your account, you may need to export to MBOX or EML files.
EML and MBOX files are the industry standard of file extensions — supported by many email clients and providers. We explain what they are in our migration guidelines(neues Fenster).
To follow the instructions in this article, you will need Proton Mail Bridge, which is available to paid accounts. These instructions will cover Thunderbird(neues Fenster), using the extension ImportExportTools NG(neues Fenster), which can be downloaded from within Thunderbird: Menu → Add-ons and Themes.
Add your Proton Mail account to Thunderbird
First, add your account to Thunderbird using Proton Mail Bridge.
To install Proton Mail Bridge, follow our guide here. Once you install it, you will be prompted by the setup wizard with further instructions on how to configure it with Thunderbird. If you are already using Bridge, open it and click Configure at the top-right, then choose Thunderbird to view the configuration guide.
Once installed, wait for the messages to synchronize before starting to import or export. You can use your account while it is synchronizing.

Once it is synchronized, the progress bar will disappear.
How to import EML files
If you have EML files on your device that are exported from Proton Mail or another service, you can import them using one of two methods:
- Drag-and-drop the files into a folder in Thunderbird
- User ImportExportTools NG to import the EMLs
Drag-and-drop the files into a folder in Thunderbird
Using this method provides an easier experience when importing a small amount of messages.
First, open Thunderbird and the folder with EML files and ensure they are both visible. Next, select the EML files in the folder, hold down your left mouse click over them, and drag them over a folder in Thunderbird.

Import EML files using ImportExportTools NG
If you have many EML files or folders to import, we recommend using the ImportExportTools add-on to facilitate the import.
Once the add-on is installed, right-click on a folder in your account → ImportExportTools NG → Import EML Messages → All EML Messages From A Directory And Subdirectories.
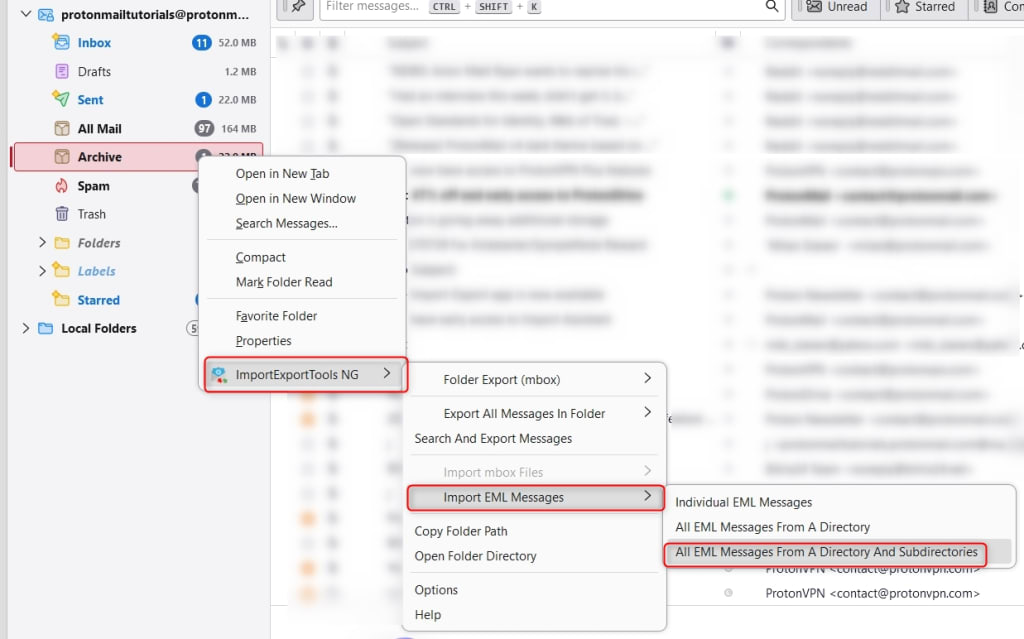
This will allow you to select the parent folder of all EML files. This will also create the folders and import the EML files. Note: folders can only be created under “Folders”, and only up to 3 levels of folders can be created in a hierarchy.
You will be able to see the progress of the import in the bottom-left corner.

How to import MBOX files
MBOX files can also be imported using Thunderbird. However, MBOX files cannot be directly imported into your Proton Mail account, so you will need to import them to a local folder first.
In Thunderbird, Local Folders are located on the left side, at the bottom of the list.
To import and MBOX files, right-click on Local Folders in Thunderbird → ImportExportTools NG → Import mbox Files → Individual MBOX files.
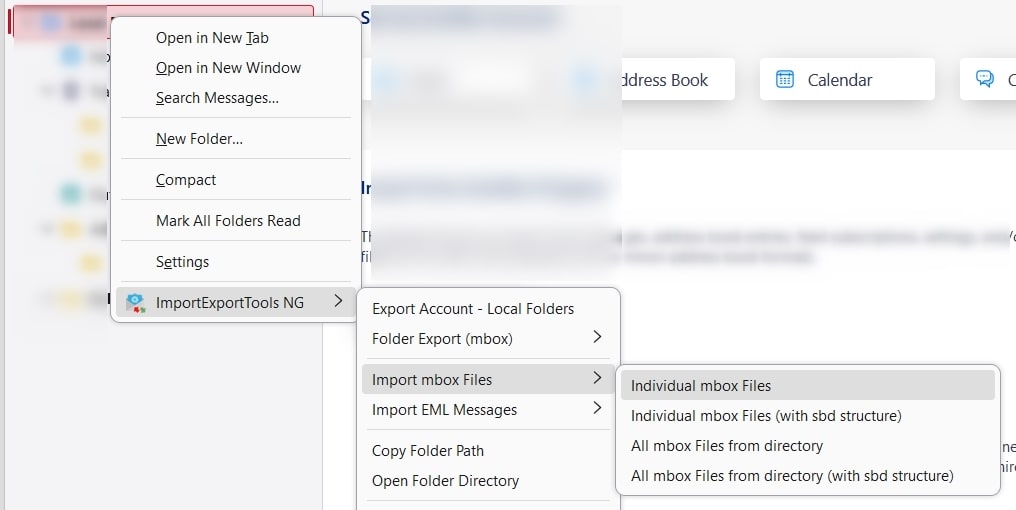
Typically, each MBOX file will include one folder of messages, so the option Individual mbox Files is most often used here.
It will take some time to process the MBOX file. After the file processes, you’ll be able to see it under Local Folders. The processing speed depends on your device. You will see the status at the bottom-left of Thunderbird.

To start importing the messages into Proton Mail, first make sure that the timeout in Thunderbird is increased.
- Click the Menu icon at the top-right and choose Settings
- Under General, scroll down to the bottom and choose Config Editor…
- Search for mailnews.tcptimeout
- Change it to a large number such as 1000.
This number sets the number of seconds that will pass until connection to the IMAP server is dropped. Setting a higher number will allow you to import more messages at the same time.
Under Local Folders, open the imported folder and select all messages (CTRL + A, CMD + A on macOS), then choose Copy To, and choose the account and folder you’d like to import them into.
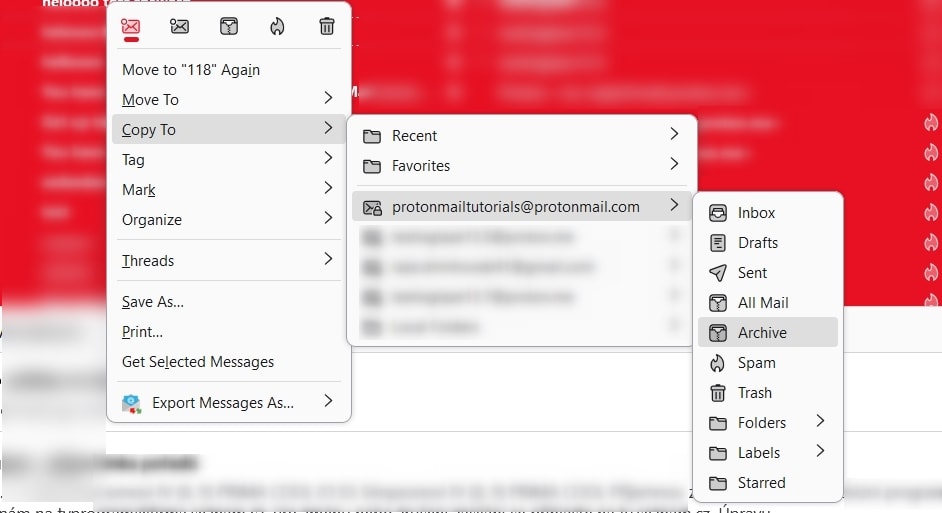
You will be able to monitor the status of the import at the bottom left.

Note: Thunderbird and Bridge both need to be running for the import to complete. The time it takes to import the messages will depend mostly on the number and size of the messages. If you have a large number of messages, we recommend doing the import in batches — such as 100 to 500 per batch — to avoid any issues. If your messages are larger, we recommend you batch fewer messages.
Things to keep in mind
When importing using IMAP, you can sometimes face certain issues.
Import speed
When using IMAP, the messages are usually imported one by one, that means that it will take some time for the import to finish, so make sure to keep the email client and Bridge running until the import is complete.
Import errors
Email messages need to abide by RFC standards. That’s why some emails cannot be imported — they are invalid per RFC standards. Issues in this case can include missing headers, incorrectly formatted email addresses in TO/From, and more.
Bridge will provide an error message in case this happens. The history of errors in Thunderbird can be accessed from Menu → Tools → Activity Manager.
Messages that failed to import will also show in the Recovered Messages Folder.
How to export messages using Thunderbird
You can also export your messages as EML files. Thunderbird has a native feature to allow exporting in EML file format. To utilize this feature:
1. Open a folder within Thunderbird.
2. Select the messages you want to export (Use CTRL/CMD + A to select all)
3. Right-click on the messages and choose Save as…
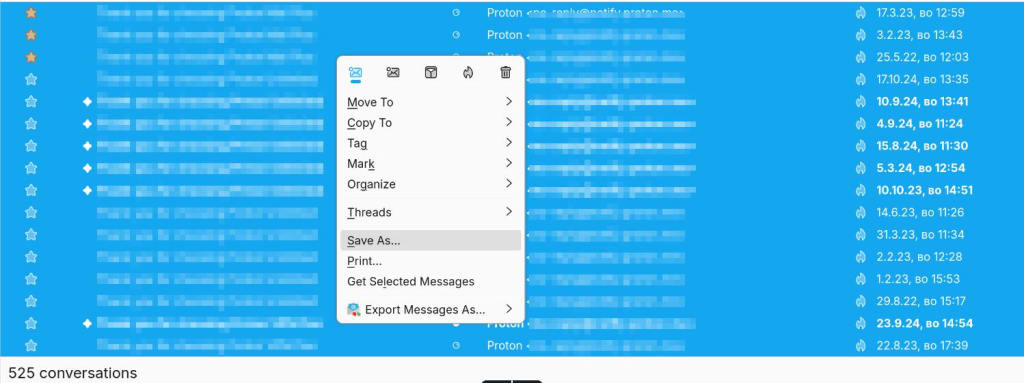
This will allow you to choose where to export the EML files to. Once you choose the location, the EML files will be exported. Bear in mind that depending on the number of messages, it can take a while to finish the export.
Export certain messages only
Thunderbird also gives you the option to perform a selective export — exporting messages between certain dates or based on other conditions, for example. To access this feature, follow our steps below.
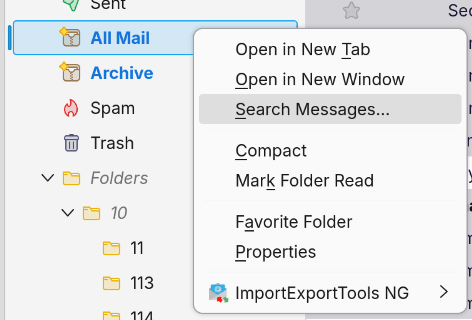
1. Right-click the folder holding the messages you want to export (choose All Mail if you want to include all folders)
2. Choose Search Messages…
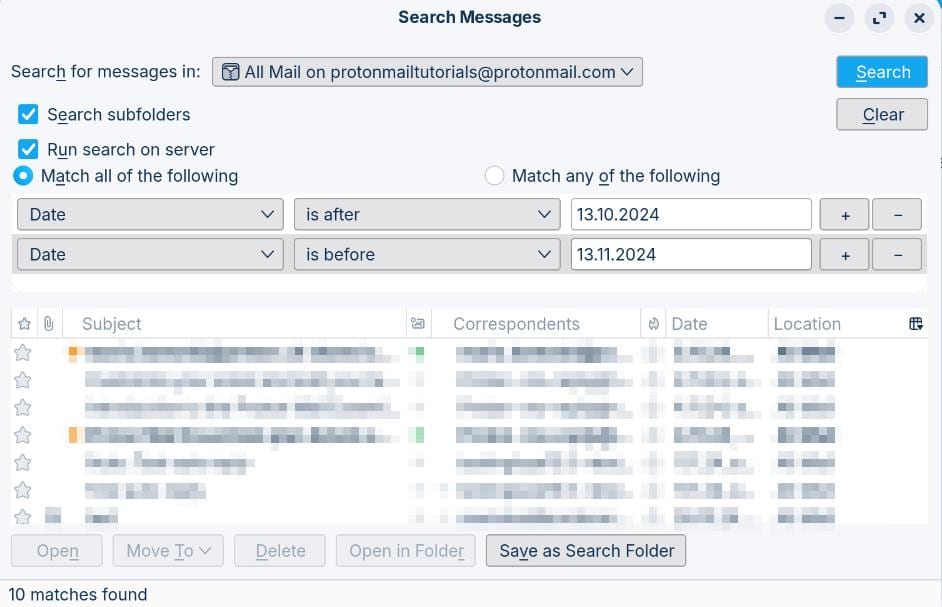
3. Configure your messages filter. In our example below, the filter is set up for exporting messages between the dates 13.10.2024 and 13.11.2024
4. Make sure Run search on server is selected
5. Click Save as Search Folder, you can name the folder EXPORT, or something else per your needs.
The folder will appear as a virtual folder (only in Thunderbird) under the folder you used for the search. This folder will not be synchronized to your Proton Mail account.

To export the messages from the search:
1. Open the newly created search folder (it might take a few seconds to load the messages)
2. Press CTRL + A to select all messages (CMD + A on macOS)
3. Right-click the messages and choose Save as…
4. Choose the location where you want to save the EML files
Migrating between Proton Mail accounts
Exporting to EML files can help you keep a copy of your messages on your device in a known format and allow you to organize the messages on your drive.
That said, if you are simply looking to create a backup of your Proton Mail account, or migrate to a different Proton Mail account, our Proton Export Tool ensures that you can always restore the backup to Proton Mail and have the same configuration as when you backed it up.